If you’ve ever cut into a beautifully seared steak only to find a gray band surrounding a pink center, you understand the frustration of traditional searing methods. That perfectly caramelized crust often comes at the cost of uneven cooking, leaving you with overcooked edges and an inconsistent eating experience.
Enter the reverse sear method—a game-changing technique that delivers restaurant-quality results with perfect edge-to-edge doneness and a flavorful crust that rivals the best steakhouses. This two-step approach combines gentle slow cooking with an intense final sear, bridging the gap between home cooking and professional precision without requiring expensive sous vide equipment.
Whether you’re working with a tender filet mignon, a marbled ribeye, or a thick cut steak from your local butcher, mastering this technique will transform how you approach cooking steak forever. Let’s dive into why the reverse sear method works so brilliantly and how you can execute it flawlessly every time.
What is Reverse Searing?
Reverse searing is a two-step cooking method that flips traditional steak preparation on its head. Instead of starting with high heat to sear a steak and then finishing at lower temperatures, this technique begins with gentle, low-temperature cooking in an oven at 200-275°F until the steak nears its target internal temperature, followed by a short, high-heat searing in a hot pan or over direct grill heat.
This method was developed to mimic the precision of sous vide steak cooking without requiring specialized equipment. While traditional searing relies on intense heat from the start, the reverse sear approach allows for superior control over the cooking process, making it nearly impossible to overcook your steak.
The reverse sear method works best with thick steaks—those measuring 1.5 inches or more in thickness. Thinner steaks cook too quickly for this technique to provide its benefits, and you risk overcooking during the final sear. Large roasts also benefit tremendously from this approach, as the extended gentle cooking phase ensures even heat penetration throughout the cut.
For thick cut steaks like strip steaks, ribeyes, and T-bone cuts, this method consistently delivers results that surpass what most home cooks can achieve with pan searing alone. The technique essentially gives you two chances to get everything right: first during the slow cooking phase, then during the final sear.
Why Reverse Searing Works Better Than Traditional Methods
The science behind reverse searing reveals why it produces superior results compared to traditional methods. Understanding these principles will help you appreciate why this technique has become the preferred method among serious home cooks and professional chefs alike.
-
Gentle Heat Transfer and Reduced Temperature Gradients
When you cook steak slowly at low temperatures, heat penetrates the meat gently and evenly. This gradual process minimizes the temperature difference between the steak’s exterior and interior, eliminating the dreaded gray band that appears with traditional high-heat methods. The result is more uniform doneness throughout the cut.
Traditional searing creates steep temperature gradients—the outside cooks much faster than the center, leading to overcooked outer layers before the center reaches the desired temperature. Slow cooking eliminates this problem by allowing enzymes like cathepsins to remain active longer at temperatures around 120-130°F, naturally tenderizing the meat during the extended cooking phase.

-
Enhanced Maillard Reaction
The initial low-heat phase serves a crucial purpose beyond gentle cooking—it dries the steak’s surface by removing moisture. This dehydration primes the meat for an exceptional Maillard reaction when you transfer it to the hot cast iron pan or cast iron skillet for the final sear.
The Maillard reaction, responsible for the deep brown crust and complex flavors we associate with perfectly seared steak, requires dry surfaces and high heat. By removing surface moisture during the oven phase, you create ideal conditions for rapid, intense browning that develops more flavor compounds than traditional methods can achieve.
-
Superior Timing Control and Flexibility
Unlike traditional searing where timing is critical and mistakes are costly, reverse searing offers remarkable flexibility. Since the steak cooks slowly and evenly, you have a much wider window for achieving your desired doneness. The steak can rest after the oven phase, allowing you to coordinate with side dishes or prepare multiple steaks without rushing.
This flexibility proves invaluable when cooking for groups or when you want to ensure everything arrives at the table simultaneously. The gentle heat also means less risk of overcooking, giving you confidence to achieve perfect medium rare or whatever doneness you prefer.
Step-by-Step Reverse Sear Method
Mastering the reverse sear technique requires attention to detail and proper timing, but the process itself is straightforward. Follow these steps for consistently excellent results every time you reverse sear a steak.
Preparation and Seasoning
Start by selecting thick cut steaks—ideally 1.5 inches or thicker. Remove the steaks from refrigeration 30-60 minutes before cooking to allow them to come closer to room temperature, which promotes more even cooking.
Season generously with kosher salt and freshly ground black pepper, ensuring complete coverage on all surfaces. For enhanced results, consider dry-brining by placing the seasoned steaks uncovered on a wire rack set over a rimmed baking sheet in the refrigerator for 2-24 hours. This process draws out moisture while concentrating flavors, leading to better crust development during the final sear.
If using your favorite steak seasoning blend, apply it during this preparation phase. Some cooks prefer to add garlic cloves, fresh thyme, or other aromatics during the slow cooking phase for additional flavor complexity.
Low-Temperature Cooking Phase
Preheat oven to 225-275°F—lower temperatures take longer but provide more even results. Place the seasoned steaks on a wire rack positioned over a rimmed baking sheet or sheet pan. This setup allows air circulation around the entire steak, promoting even cooking and preventing the bottom from steaming.
For those preferring outdoor cooking, set up your gas grill or charcoal grill for indirect heat, maintaining the same temperature range. On a charcoal grill, bank coals to one side and place steaks on the cooler side of the grate.
Cook the steaks until they reach an internal temperature 10-15°F below your target doneness. Use an instant read thermometer or probe thermometer for accuracy—this step is crucial for success. A meat thermometer takes the guesswork out of the process.
|
Doneness |
Target Internal Temp |
Pull Temperature |
|
Rare |
120-125°F |
110-115°F |
|
Medium Rare |
130-135°F |
120-125°F |
|
Medium |
135-140°F |
125-130°F |
|
Medium-Well |
145-150°F |
135-140°F |
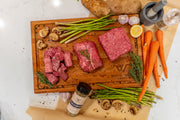
High-Heat Searing Phase
While the steaks rest after the oven phase, heat a cast iron skillet, cast iron pan, or heavy-bottomed pan over high heat until it begins to smoke. Add a high-heat oil like avocado oil or a neutral oil that won’t burn at high temperatures.
Carefully place the steaks in the hot skillet and sear for 45-90 seconds per side, depending on thickness and desired crust development. You’ll hear an immediate sizzle when the steak hits the hot pan—this aggressive searing creates the deep brown crust that makes the reverse sear method so appealing.
For extra richness, add unsalted butter, clarified butter, or even compound butter during the final moments of searing, along with crushed garlic cloves and fresh herbs. Tilt the pan and baste the steaks with the foaming butter for enhanced flavor and color.
Resting and Serving
After achieving a beautiful caramelized crust, transfer the perfectly cooked steaks to a cutting board and rest for 5-10 minutes. This resting period allows juices to redistribute throughout the meat, ensuring a juicy steak when sliced.
During this final rest, the internal temperature will continue to rise slightly due to carryover cooking, reaching your desired temperature precisely. The result is a delicious steak with uniform doneness from edge to edge and a crispy, flavorful exterior that showcases the best of both gentle cooking and aggressive searing.
Temperature Guidelines and Timing
Precision is key when executing the reverse sear method, making reliable temperature monitoring essential for consistent results. Understanding proper timing and temperature control will help you achieve your desired doneness every time.
Essential Temperature Monitoring
A quality instant read thermometer or leave in meat thermometer is non-negotiable for reverse searing success. Digital probe thermometers that remain in the steak during cooking provide continuous monitoring, alerting you when it’s time to remove the steak from the oven.
Remember that carryover cooking continues after removing the steak from heat. Internal temperatures typically rise 3-5°F during resting, which is why you pull the steak before it reaches your target temperature. This principle applies whether you’re aiming for perfect medium rare or any other level of doneness.
Timing Guidelines by Thickness
Oven temperature and steak thickness determine cooking time during the slow phase. Here are approximate guidelines for steaks cooked at 225°F:
-
1.5-inch thick steak: 25-35 minutes to reach medium rare
-
2-inch thick steak: 35-45 minutes to reach medium rare
-
2.5-inch thick steak: 45-60 minutes to reach medium rare
These times can vary based on starting temperature, exact oven calibration, and individual steak characteristics. Always rely on internal temperature rather than time alone for best results.
Visual Cues for Perfect Results
Beyond temperature, visual indicators help confirm proper execution. During the oven phase, the steak’s surface should appear slightly dried but not darkened. When you achieve the proper hot sear, you’ll see immediate browning and hear aggressive sizzling in the hot cast iron.
A well-executed reverse seared steak displays a deep, even crust with consistent color from edge to edge when sliced. The interior should show your desired doneness throughout, without the gray bands common in traditionally seared steaks.
Equipment and Tools Needed
Success with the reverse sear method depends on having the right equipment. While the technique doesn’t require expensive specialty tools, certain items will significantly improve your results and make the process more manageable.

Essential Equipment
-
A wire rack is crucial for proper air circulation during the oven phase. Place it over a rimmed baking sheet to catch any drippings while allowing heat to circulate completely around the steak. Without this setup, the bottom of your steak may steam rather than cook evenly.
-
An accurate instant read thermometer removes all guesswork from the process. Digital models with thin probes provide quick, precise readings without leaving large holes in your steak. Some cooks prefer probe thermometers that remain in the meat, providing continuous monitoring throughout the cooking process.
-
For the searing phase, a heavy-bottomed pan is essential. Cast iron skillets excel at retaining and distributing heat evenly, creating the intense surface temperature needed for proper crust development. Carbon steel and heavy stainless steel pans also work well, though they may require slight adjustments to technique.
Outdoor Cooking Options
The reverse sear method translates beautifully to outdoor cooking. On a gas grill, set up a two-zone fire with one side at low heat for the initial cooking phase and the other at high heat for searing. This setup gives you precise control over both phases of the cooking process.
For charcoal grill enthusiasts, bank hot coals to one side and use the cooler side for slow cooking. A chimney starter helps achieve even charcoal ignition, while lump charcoal provides consistent heat output. After the slow phase, move steaks directly over the hot coals for the final sear.
Optional Equipment for Enhanced Results
While not essential, certain tools can elevate your reverse searing game. A good cutting board with a juice groove prevents mess when slicing. Tongs with good grip help handle steaks safely during the searing phase.
Some cooks invest in an oven-safe wire rack that fits perfectly in their preferred baking sheet, creating a dedicated setup for this technique. Others prefer adjustable probe thermometers with preset alarms for different doneness levels.
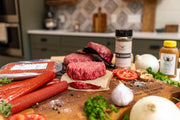
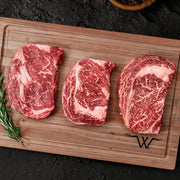
Best Cuts for Reverse Searing
The reverse sear method works exceptionally well with specific cuts of beef, particularly those that benefit from the technique’s ability to deliver even cooking throughout thick cuts while developing an exceptional crust.
Ideal Thick-Cut Steaks
-
Wagyu Ribeye steaks are perhaps the perfect candidate for reverse searing. Intense marbling provides built-in flavor and moisture, while their thickness allows the technique to showcase its strengths. The fat content helps keep the meat tender during the extended cooking time.
-
Wagyu New York strip steak and strip steaks in general respond beautifully to this method. The firm texture holds up well to the two-phase cooking process, and the technique helps break down some of the cut’s natural chewiness while preserving its distinctive flavor.
-
Tender Wagyu filet mignon benefits tremendously from reverse searing, as the gentle cooking phase preserves its delicate texture while the final sear provides the crust that this lean cut often lacks. The method ensures you don’t overcook this expensive cut.
-
Wagyu T-bone and Wagyu porterhouse steaks, with their combination of strip and tenderloin, can be challenging to cook evenly using traditional methods. Reverse searing ensures both sides of these cuts reach proper doneness simultaneously, something difficult to achieve with conventional techniques.
Minimum Thickness Requirements
The reverse sear method requires steaks of at least 1.5 inches thick to be effective. Thinner cuts cook too quickly during the oven phase, leaving insufficient time for the technique’s benefits to manifest. Moreover, thin steaks risk overcooking during the final sear phase.
Thick cut steaks of 2 inches or more showcase this method at its best. The extended gentle cooking phase allows for superior enzyme activity and moisture redistribution, while the substantial thickness provides a good canvas for crust development without overcooking the interior.
Cuts to Avoid
Thin steaks like minute steaks or butterfly-cut pieces don’t benefit from reverse searing. These cuts cook too quickly for the method to provide advantages over traditional searing techniques.
Tough cuts that benefit from braising, like chuck or round steaks, aren’t ideal candidates either. While reverse searing can help with tenderness through enzymatic action, these cuts generally require different cooking methods to break down their connective tissue effectively.
Reverse Searing vs Sous Vide Comparison
Both reverse searing and sous vide cooking aim to achieve precise temperature control and even doneness, but each method offers distinct advantages depending on your priorities and available equipment.
Similarities in Approach
Both techniques separate the cooking process into two phases: gentle, controlled heating followed by high-temperature searing. This separation allows for superior control over doneness while ensuring excellent crust development.
Each method minimizes the risk of overcooking by avoiding the high initial heat that characterizes traditional steak cooking. Both produce steaks with minimal temperature gradients and more consistent doneness from edge to edge.
Reverse Searing Advantages
The reverse sear method typically produces superior crust development compared to sous vide steak. The oven’s dry heat removes surface moisture more effectively than sous vide’s wet environment, creating ideal conditions for Maillard reaction during the final sear.
Flavor development often favors reverse searing as well. The dry-heat roasting process can enhance certain savory notes and create subtle complexity that sous vide sometimes lacks. The method also allows for easy seasoning integration throughout the cooking process.
From a practical standpoint, reverse searing requires only basic kitchen equipment that most home cooks already own. There’s no need for specialized immersion circulators, vacuum sealers, or water baths.
When to Choose Each Method
Choose reverse searing when crust quality is your top priority and you’re working with thick steaks. The method excels for special occasions when you want to showcase proper technique and achieve restaurant-quality results with standard equipment.
Sous vide offers advantages for batch cooking multiple steaks or when you need absolute certainty about doneness. It’s also beneficial when timing is critical, as sous vide steaks can hold at temperature for extended periods without degradation.
For most home cooks working with individual thick steaks and prioritizing flavor and crust development, reverse searing provides the best balance of results, equipment requirements, and technique satisfaction.
Common Mistakes and How to Avoid Them
Even with its forgiving nature, the reverse sear method has potential pitfalls that can compromise your results. Understanding these common mistakes helps ensure success every time you cook a steak using this technique.
-
Using Inappropriate Steak Thickness
The most frequent error is attempting to reverse sear thin steaks. Cuts under 1.5 inches thick don’t provide enough time for the method’s benefits to manifest during the oven phase. These steaks risk overcooking during the final sear before developing a proper crust.
Always select thick cut steaks when planning to use this method. If you only have access to thinner cuts, traditional pan searing or grilling methods will serve you better.
-
Insufficient Slow Cooking Time
Rushing the oven phase undermines the entire technique. Some home cooks, eager to move to the searing phase, pull steaks too early. This creates larger temperature gradients and reduces the even cooking that makes reverse searing special.
Trust your meat thermometer and allow adequate time for the slow cooking phase. The patience invested here pays dividends in the final result’s quality and consistency.
-
Skipping the Dry-Brining Step
While not absolutely essential, skipping the dry-brining phase means missing out on improved flavor concentration and surface drying that enhances crust formation. This optional step provides significant benefits for minimal additional effort.
Plan ahead when possible to incorporate this step, especially for special occasions when you want to maximize the technique’s potential.
-
Inadequate Pan Preheating
Failing to properly preheat your searing surface is perhaps the most crucial error during the final phase. A hot skillet that isn’t quite hot enough won’t create the rapid browning necessary for excellent crust development.
Heat your cast iron skillet until it begins to smoke before adding oil and steaks. This ensures immediate, aggressive searing that creates the contrast between gentle cooking and intense finishing that defines the method.
-
Overcooking During the Sear
Even with perfectly executed slow cooking, overcooking during the searing phase can ruin your results. Some cooks, mesmerized by the browning process, leave steaks in the hot pan too long.
Remember that searing should take only 45-90 seconds per side for most steaks. Focus on color development rather than extended cooking time during this phase.
Disadvantages and Limitations
While the reverse sear method produces exceptional results, it’s important to understand its limitations and when other cooking methods might be more appropriate for your needs.
Extended Cooking Time
The most significant drawback of reverse searing is the time investment required. The slow cooking phase alone takes 25-45 minutes or more, depending on steak thickness and desired doneness. This extended timeline makes the method impractical for quick weeknight dinners or spontaneous steak cooking.
Traditional pan searing can deliver a well-cooked steak in under 10 minutes, making it more suitable when time is a primary concern. The reverse sear method works best when you can plan ahead and aren’t constrained by tight timing.
Limited Pan Sauce Opportunities
The reverse sear method produces less fond (browned bits) in your pan compared to traditional searing methods. Since the actual searing time is brief and the steaks have less surface moisture, you’ll generate fewer pan drippings to build sauces around.
If pan sauces are important to your meal planning, you may need to supplement with additional ingredients or consider hybrid approaches that incorporate traditional searing elements.
Planning Requirements
The technique demands advance planning, especially if you want to incorporate the beneficial dry-brining step. This forward thinking requirement makes it less suitable for impromptu cooking decisions or when flexibility is important.
The method also requires you to coordinate timing with side dishes, as the extended cooking process affects meal preparation schedules. Some cooks find this planning aspect constraining compared to more spontaneous cooking approaches.
Impracticality for Thin Cuts
Many commonly available steaks don’t meet the thickness requirements for effective reverse searing. If you frequently cook thinner steaks or prefer cuts like skirt or flank steak, this method won’t be applicable to your regular cooking routine.
The technique’s specificity to thick cuts means it can’t be your go-to method for all steak cooking situations, requiring you to maintain proficiency in multiple techniques.
Despite these limitations, for thick steaks and situations where quality trumps speed, the reverse sear method consistently delivers results that justify the additional time and planning investment. Understanding when to use this technique—and when to choose alternatives—will help you make the best decisions for your specific cooking goals and constraints.

Conclusion
The reverse sear method represents a perfect blend of food science and practical technique, offering home cooks a reliable path to restaurant-quality results. By understanding the principles behind gentle heat transfer, proper equipment use, and precise timing, you can consistently produce steaks with edge-to-edge doneness and exceptional crust development.
Whether you’re working with a thick ribeye, a tender filet mignon, or any other substantial cut, mastering this technique will elevate your steak cooking to new heights. The method’s forgiving nature and scientific foundation make it an invaluable addition to any serious cook’s repertoire.
Transform your next thick steak into a restaurant-quality masterpiece by giving the reverse sear method a try—your taste buds will thank you for the perfectly even doneness and incredible crust that only this technique can deliver.